How to replace the front struts and sway bar links on a 2002 Dodge Grand Caravan
Today was a really busy day. This morning I put new struts on Ty's van, and this afternoon I put an alternator on a Hummer H2. Fun!
Directions:
Replacing the struts was pretty straightforward. You Jack up the car, remove the wheel, remove the sway bar link (1 Nut) , remove the brackets that hold the ABS Sensor Wire (1 Bolt), then remove the two bolts that hold the spindle onto the strut. With that done, take out the three bolts at the top of the strut under the hood and the strut will come out with a minimum of fiddling.
Tools:
I used a LOT of tools to get this done. At a minimum, I wouldn't try this without a set of jackstands, a set of wrenches, a 6mm Allen Wrench, a hammer, a 3/4 inch socket set with a stout breaker bar and a long piece of pipe for extra leverage. I used the above and a 1/4 inch socket set, a couple of pry bars, and a 3/4" impact wrench.
Pics:


Tips:
When you put the car on jackstands, get both sides up off the ground at the same time. This takes the stress off of the sway bar and makes getting the links off easier.
By far the hardest part of DIYing this is removing the two bolts that hold the strut onto the spindle. Seriously, these are on TIGHT. I broke a 22mm wrench on one of these. My son looked at me like I was some kind of ultra-strong humanoid wrench crushing cyborg when he saw it snap. That was pretty awesome.
Before you take anything apart,mark the orientation of these bolts (Red Arrows) so you can get them back close to their original position. Then use a heavy socket, your breaker bar, and a cheater pipe for leverage to loosen them. I'd suggest not taking anything else apart until this is done because this is the part where your DIY ambitions can seriously fail. Loosen the nuts, and do not let the bolts spin in the knuckle. The bottom bolt has serrations on it and will gnaw out the hole. The Top bolt has a cam on it, and you don't want to mess these up. For the record, my Harbor Freight Impact wrench could not budge these nuts. I think I actually heard the nuts laughing at my impact wrench. The leverage from the 5' cheater pipe was what it took. Once loose, the top bolt comes out pretty easy. You may have to rotate it to get the cam lined up properly to get it out. The bottom bolt is wedge tightly in the hole, and requires tapping with a hammer to get it out. Be careful not to screw up the threads.
After you've got those out, take off the top Sway Bar Link bolt (Green Arrow). For the OEM parts, you have to loosen this with an 18mm wrench while you keep the bolt from rotating with an Allen wrench. It's kind of a pain, but doable. The aftermarket replacement parts I got had a wrench flat to hold them for reinstallation. Much better.
With the Sway Bar Link pivoted out of the way you can get a 10mm socket and ratchet on the bolt (First picture, Yellow arrow) for the ABS Sensor Wire bracket. Easy peasy.
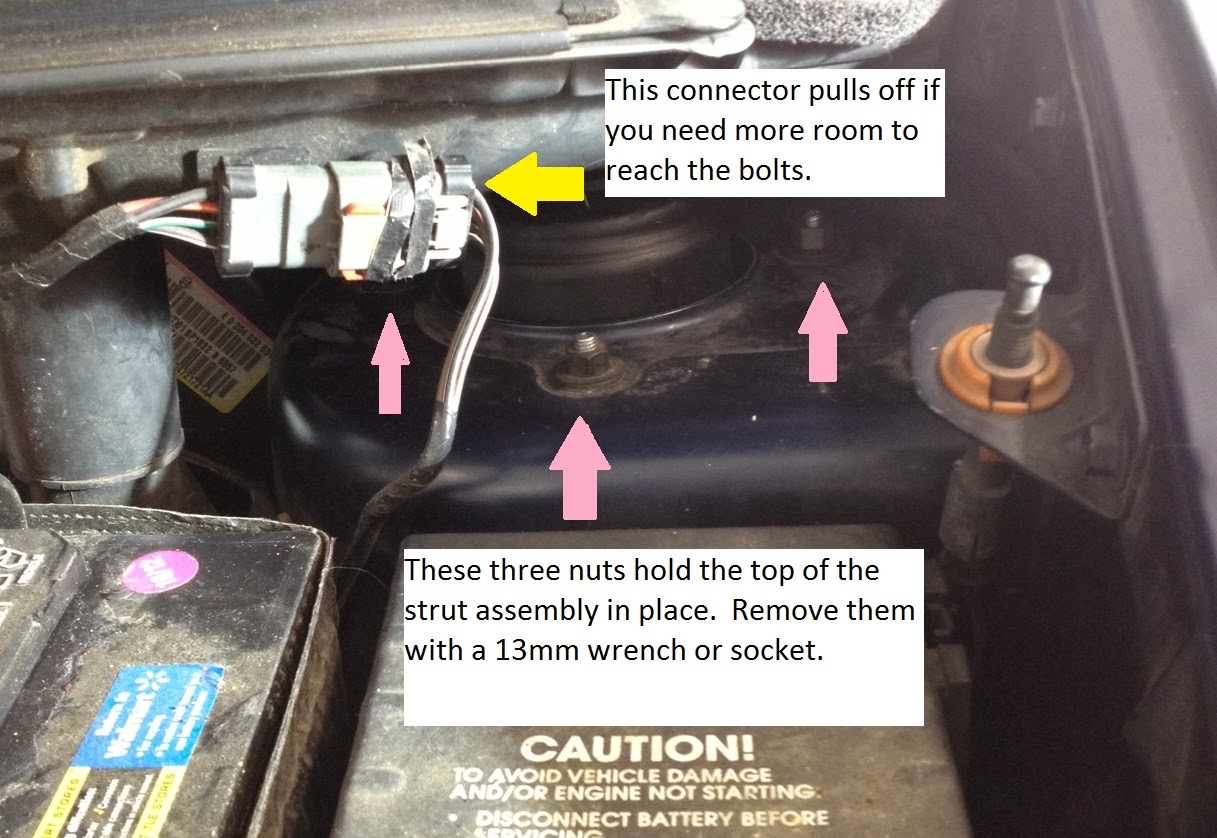
Next comes the 3 bolts under the hood that hold the top end of the strut. (Second Picture, Pink Arrows) It's kind of tight, so you have to use a 13mm wrench or 1/4" drive socket set to get at these. On the driver's side there is an electrical connector in the way. It's held on with push pins, and can be pulled off if you need it out out of the way. (Second Picture Yellow Arrow)
With those out, gingerly maneuver the old strut out. It's very gratifying to get that done.
At this point you can use a tool to compress the coil springs and disassemble the strut or you can cheat. I cheated. I bought Monroe Quick-Struts from O'Reilly Auto Parts. These come pre-assembled with the strut, spring, and upper bearing all in a shiny new assembly and O'Reilly had them on the shelf. No special order was required. I really wanted the cheaper option, but the store did not have a spring compressor in stock when I went. I could have gone elsewhere to get the tool but I didn't. In hindsight, I'm happy with my choice even if it did make the job slightly more expensive.
With everything disassembled, I took off the lower sway bar link mount nut and replaced the links. One of mine was completely broken and the boots on the other were shredded. Getting the strut out of the way before replacing this made it a lot easier to get this one off.
Reassembly is straightforward. It really helps to have a person to start the first bolt on the strut upper mount while you hold it in place. Tetris'ing the 50 pound strut into place is not particularly easy, and having a helper is awesome. Try to line up your reference marks on the knuckle as best as possible, this helps get the car alignment close to the old settings. Even with great car in reassembly, the car will likely still need a alignment when you are done.
While you've got everything apart, check the brakes and CV joint boots. If they are even marginal, go ahead and fix them now while it's all apart.
The total cost to replace the struts on both sides and the new sway bar links was $440 and I finished it in 3.5 hours. Ty has an appointment for an alignment at Firestone on Monday, but it's free because we have their "Lifetime Alignment". This is not an easy project, but I saved $300 off of the mechanic price. I could have saved an extra $150 if I'd been patient enough to get the parts from RockAuto and replaced just the struts instead of the complete assembly.
My next post is a surprise project that fell in my lap.. stay tuned.
Directions:
Replacing the struts was pretty straightforward. You Jack up the car, remove the wheel, remove the sway bar link (1 Nut) , remove the brackets that hold the ABS Sensor Wire (1 Bolt), then remove the two bolts that hold the spindle onto the strut. With that done, take out the three bolts at the top of the strut under the hood and the strut will come out with a minimum of fiddling.
Tools:
I used a LOT of tools to get this done. At a minimum, I wouldn't try this without a set of jackstands, a set of wrenches, a 6mm Allen Wrench, a hammer, a 3/4 inch socket set with a stout breaker bar and a long piece of pipe for extra leverage. I used the above and a 1/4 inch socket set, a couple of pry bars, and a 3/4" impact wrench.
Pics:
Tips:
When you put the car on jackstands, get both sides up off the ground at the same time. This takes the stress off of the sway bar and makes getting the links off easier.
By far the hardest part of DIYing this is removing the two bolts that hold the strut onto the spindle. Seriously, these are on TIGHT. I broke a 22mm wrench on one of these. My son looked at me like I was some kind of ultra-strong humanoid wrench crushing cyborg when he saw it snap. That was pretty awesome.
Before you take anything apart,mark the orientation of these bolts (Red Arrows) so you can get them back close to their original position. Then use a heavy socket, your breaker bar, and a cheater pipe for leverage to loosen them. I'd suggest not taking anything else apart until this is done because this is the part where your DIY ambitions can seriously fail. Loosen the nuts, and do not let the bolts spin in the knuckle. The bottom bolt has serrations on it and will gnaw out the hole. The Top bolt has a cam on it, and you don't want to mess these up. For the record, my Harbor Freight Impact wrench could not budge these nuts. I think I actually heard the nuts laughing at my impact wrench. The leverage from the 5' cheater pipe was what it took. Once loose, the top bolt comes out pretty easy. You may have to rotate it to get the cam lined up properly to get it out. The bottom bolt is wedge tightly in the hole, and requires tapping with a hammer to get it out. Be careful not to screw up the threads.
After you've got those out, take off the top Sway Bar Link bolt (Green Arrow). For the OEM parts, you have to loosen this with an 18mm wrench while you keep the bolt from rotating with an Allen wrench. It's kind of a pain, but doable. The aftermarket replacement parts I got had a wrench flat to hold them for reinstallation. Much better.
With the Sway Bar Link pivoted out of the way you can get a 10mm socket and ratchet on the bolt (First picture, Yellow arrow) for the ABS Sensor Wire bracket. Easy peasy.
Next comes the 3 bolts under the hood that hold the top end of the strut. (Second Picture, Pink Arrows) It's kind of tight, so you have to use a 13mm wrench or 1/4" drive socket set to get at these. On the driver's side there is an electrical connector in the way. It's held on with push pins, and can be pulled off if you need it out out of the way. (Second Picture Yellow Arrow)
With those out, gingerly maneuver the old strut out. It's very gratifying to get that done.
At this point you can use a tool to compress the coil springs and disassemble the strut or you can cheat. I cheated. I bought Monroe Quick-Struts from O'Reilly Auto Parts. These come pre-assembled with the strut, spring, and upper bearing all in a shiny new assembly and O'Reilly had them on the shelf. No special order was required. I really wanted the cheaper option, but the store did not have a spring compressor in stock when I went. I could have gone elsewhere to get the tool but I didn't. In hindsight, I'm happy with my choice even if it did make the job slightly more expensive.
With everything disassembled, I took off the lower sway bar link mount nut and replaced the links. One of mine was completely broken and the boots on the other were shredded. Getting the strut out of the way before replacing this made it a lot easier to get this one off.
Reassembly is straightforward. It really helps to have a person to start the first bolt on the strut upper mount while you hold it in place. Tetris'ing the 50 pound strut into place is not particularly easy, and having a helper is awesome. Try to line up your reference marks on the knuckle as best as possible, this helps get the car alignment close to the old settings. Even with great car in reassembly, the car will likely still need a alignment when you are done.
While you've got everything apart, check the brakes and CV joint boots. If they are even marginal, go ahead and fix them now while it's all apart.
The total cost to replace the struts on both sides and the new sway bar links was $440 and I finished it in 3.5 hours. Ty has an appointment for an alignment at Firestone on Monday, but it's free because we have their "Lifetime Alignment". This is not an easy project, but I saved $300 off of the mechanic price. I could have saved an extra $150 if I'd been patient enough to get the parts from RockAuto and replaced just the struts instead of the complete assembly.
My next post is a surprise project that fell in my lap.. stay tuned.


Comments